

How To Clean Stazon Ink From Stamps
Using Rubber Block & Peg Stamps
1: Apply ink to your stamp. Gently press your stamp into the ink pad 2-3 times. If you press too hard, you might fill in the detailed crevices in your stamp, causing you to get a "muddy" image.
2: Stamp it! Don't rock your stamp back and forth to apply the stamp. Simply press straight down and pull straight back up.
3: Dry and clean. Allow 3-5 minutes for the ink to dry, otherwise you may smear your design. Use the StazOn cleaner to remove the ink from your stamp before putting it away.
Using Sheet Stamps
1: Apply ink to your stamp. Gently press the ink pad onto the stamp, covering the area you're going to use. If you press too hard, you might fill in the detailed crevices in your stamp, causing you to get a "muddy" image.
2: Stamp it! Lay the piece that you want to stamp on your table. Holding one end of the stamp firmly in place, roll the stamp onto your piece. Once in place, apply slight pressure.
3: Dry and clean. Peel the stamp off of your piece using the same rolling motion as when you applied the stamp. Allow 3-5 minutes for the ink to dry, otherwise you may smear your design. To clean your stamps, a baby wipe works best, but you can also use StazOn cleaner with just a little bit of warm water. Stamp cleaner is not necessary but can be used if desired.
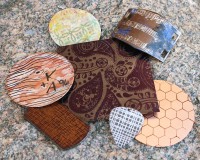 Create a background pattern
Another way to add depth and texture to your designs is to layer stamped images on one another. I wanted to create a textured appearance on this owl blank like tone-on-tone fabric. I chose to use a border stamp and the StazOn copper metallic ink. One stamping did the trick!
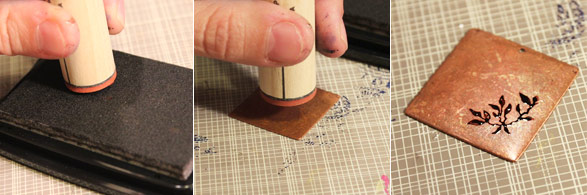
 Basic stamping on a metal blank
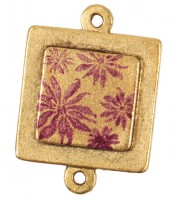
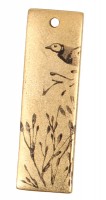
StazOn ink is perfect for stamping designs onto metal pieces like tags or blanks. Since I was stamping just a single design, I opted for a colored ink that would complement the gold tones. Purple was my choice for the pictured piece.
 Apply StazOn directly to your piece
One technique is to apply color directly to your tag prior to stamping. Simply press your piece directly onto one or more StazOn ink pads to coat it with color. The pictured piece uses several different inks to prepare the base layer. Wait for the ink to dry after each application, then stamp your image using jet black or another dark color.
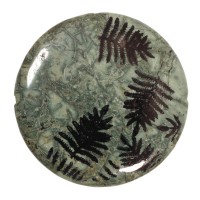 Stamp on a gemstone pendant
StazOn can also be used to stamp images onto gemstones! Larger gemstone pieces that have flat smooth surfaces to work nicely for stamps. I chose a pendant that didn't have a pattern that would compete with the stamp design, and my ink of choice was black to keep it simple.
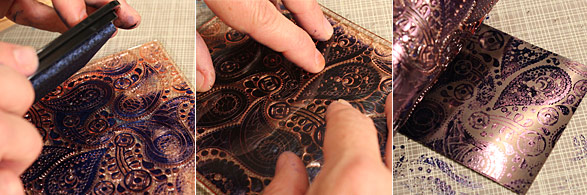
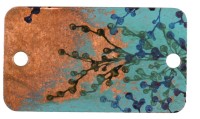 Stamp on a painted surface
To create this look I used acrylic paint dabbers to color the surface and waited for the paint to dry. Then I buffed off portions of the paint to allow the copper to show through. Finally, I stamped the design with alternating colors. It is best to allow the ink to dry between each stamping, and to clean the rubber stamp before moving to the next color.
 Combine multiple stamp designs
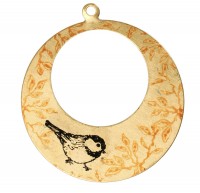
For this piece I chose 2 rubber stamps that had similar characteristics and worked in a single color–jet black. I stamped the grass first, then decided where to stamp the bird. Combining stamps is a great way to mix-and-match images into a scene that tells a story.
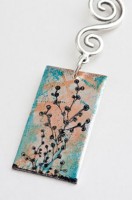
 Complement a stamp with a subtle metallic background
Looking to add some more texture to your designs? Try using metallic ink as a base and then stamping a bolder design on top. For this piece, I started with a botanical design and began stamping using StazOn metallic copper ink. I waited for it to dry completely so I wouldn't accidentally smear anything while trying to stamp the bird. Voilà!
General Rubber Stamping Tips
- Put a pad of paper, magazine, or a mouse pad underneath your stamping project. This gives a cushion-like base and makes better impressions.
- If you see a circle or edge around your peg stamp image, it means that you are applying too much pressure on your stamp. Fine line drawings need only gentle pressure or it will distort the image and you will not see the detail. It is a good idea to test your stamp and your ink on a scrap piece of paper before stamping on your project. If you want a richer look, you may need to re-ink your pad.
- To get a lighter shade of color with the second and third impressions, don't re-ink your stamp each time. Also, for a less mechanical look, rotate the stamp slightly in between impressions. These two tips will give your artwork a more natural look.
- To re-ink a pad, put two or three drops of ink on the pad and rub it in with the nozzle of the refill bottle until you see the ink is absorbed.
- To make a wreath shape, I start by stamping at the North, South, East and West points. Then just fill in between with the remaining images.
- For borders, I normally start with the larger images, leaving space in between for the remaining images and fill in as needed.
- All of these peg stamps are designed with placement lines to help you place your images accurately. If you look at the base of the stamp, close to the rubber, you will see the vertical placement line. This line indicates the position of the image. In the case of a leaf, sprig or branch, the placement line is most often located at the stem. Just turn the line towards the other images, such as a flower, and you will get perfect placement every time.
- It is best to store your stamps out of direct sunlight. With a bit of care, they should last for years and years.
- When the photopolymer (clear) stamps appear to lose their cling, simply rinse with warm water, and air dry. The cling will come right back and they'll adhere like new!
- The photopolymer stamps can be used right out of the package, but you may want to condition them by rubbing your fingers over the surface or simply by stamping a few test images on scratch paper first.
Ready to try?
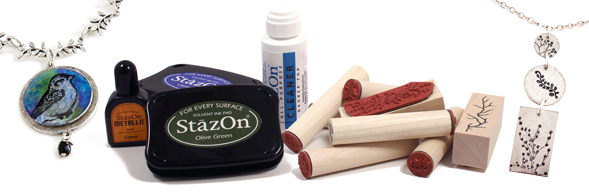
If you're ready to start stamping with StazOn, check out the following items:
- Rubber Peg & Block Stamps – lots of designs!
- Sheet Stamps – great way to add pattern to your project.
- StazOn Inks – fun colors, including metallics
- Metal Stamping Blanks in different metals
How To Clean Stazon Ink From Stamps
Source: https://www.limabeads.com/Using-Rubber-Stamps-and-StazOn-T41
Posted by: thompsonprien1967.blogspot.com
0 Response to "How To Clean Stazon Ink From Stamps"
Post a Comment